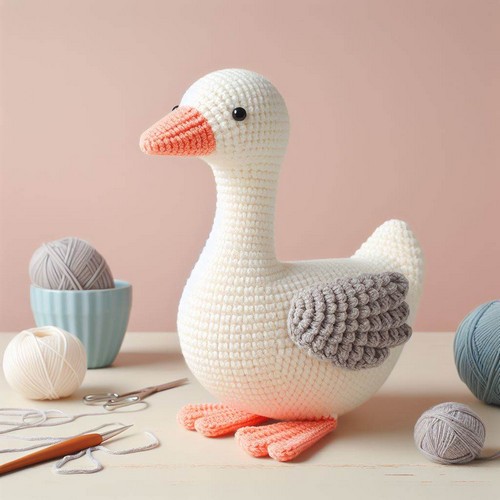
The Crochet Goose Amigurumi Pattern is a comprehensive guide for creating a charming, handmade goose toy using the craft of crochet. This pattern incorporates basic crochet stitches, making it accessible to beginners, yet it holds interest for experienced crafters with its intricate detailing. Inside this guide, you will find step-by-step instructions, including image diagrams, to help each project phase. Thus, whether you desire a novelty gift or a new crafting project, the Crochet Goose Amigurumi Pattern is an exciting choice.
Crochet Goose Amigurumi Pattern
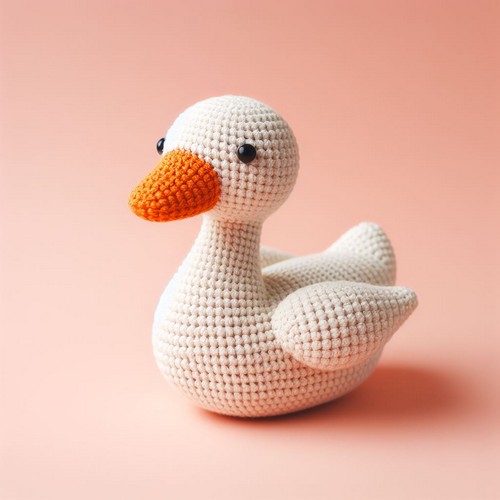
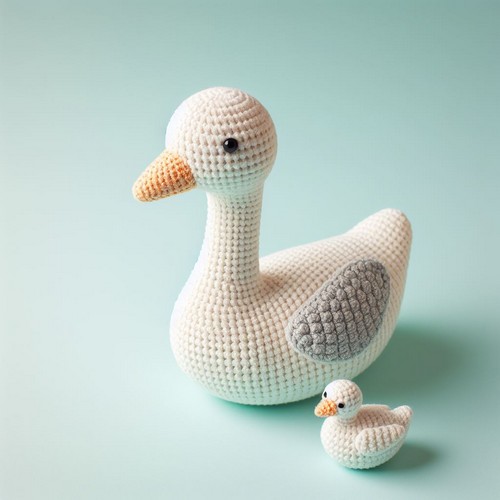
The Crochet Goose Amigurumi Pattern creates a charming, plush goose with a soft appearance. You make it by crocheting yarn in tight, even stitches, following steps to shape its body, wings, and beak. Details are added last to give it personality.
Making Your Crochet Goose Amigurumi Pattern
Materials:
- Worsted weight yarn in white, orange, black, and gray (optional for the beak details)
- Crochet hook (size depends on yarn weight, but the image uses a 4.5 mm hook)
- Stuffing
- Yarn needle
- Scissors
- Two black safety eyes
Step By Step Pattern
Stitches and techniques used:
- Single crochet (sc)
- Increase (inc)
- Decrease (dec)
- Magic ring (mr)
- Chain (ch)
- Slip stitch (sl st)
Instructions:
1. Body:
- Using white yarn, start with a magic ring and crochet 6 single crochets (sc) in the ring. Join with a slip stitch (sl st).
- Round 2: Increase in each stitch around (12 sc). Join with a sl st.
- Round 3: Increase in every other stitch around (18 sc). Join with a sl st.
- Round 4: Increase in every third stitch around (24 sc). Join with a sl st.
- Rounds 5-8: sc in each stitch around, joining each round with a sl st.
- Round 9: Increase in every fourth stitch around (30 sc). Join with a sl st.
- Rounds 10-12: sc in each stitch around, joining each round with a sl st.
- Round 13: Increase in every fifth stitch around (36 sc). Join with a sl st.
- Rounds 14-16: sc in each stitch around, joining each round with a sl st.
- Round 17: Increase in every sixth stitch around (42 sc). Join with a sl st.
- Rounds 18-20: sc in each stitch around, joining each round with a sl st.
- Round 21: Stuff the body firmly. Decrease in every sixth stitch around (36 sc). Join with a sl st.
- Round 22: Decrease in every fifth stitch around (30 sc). Join with a sl st.
- Round 23: Decrease in every fourth stitch around (24 sc). Join with a sl st.
- Round 24: Decrease in every third stitch around (18 sc). Join with a sl st.
- Round 25: Decrease in every other stitch around (12 sc). Join with a sl st.
- Round 26: Decrease in each stitch around (6 sc). Join with a sl st. Tie off and weave in the end.
2. Head:
- With white yarn, start with a magic ring and crochet 6 sc in the ring. Join with a sl st.
- Round 2: Increase in each stitch around (12 sc). Join with a sl st.
- Round 3: Increase in every other stitch around (18 sc). Join with a sl st.
- Rounds 4-5: sc in each stitch around, joining each round with a sl st.
- Round 6: Increase in every third stitch around (24 sc). Join with a sl st.
- Rounds 7-8: sc in each stitch around, joining each round with a sl st.
- Round 9: Increase in every fourth stitch around (30 sc). Join with a sl st.
- Rounds 10-11: sc in each stitch around, joining each round with a sl st.
- Round 12: Stuff the head firmly. Decrease in every fourth stitch around (24 sc). Join with a sl st.
- Round 13: Decrease in every third stitch around (18 sc). Join with a sl st.
- Round 14: Decrease in every other stitch around (12 sc). Join with a sl st.
- Round 15: Decrease in each stitch around (6 sc). Join with a sl st. Tie off and weave in the end.
3. Beak:
- With orange yarn, chain 5 stitches.
- Slip stitch into the first chain from the hook to form a ring.
- Round 1: sc in each stitch around (5 sc). Join with a sl st.
- Round 2-4: sc in each stitch around, joining each round with a sl st. (Optional: In rounds 3 and 4, you can use gray yarn to embroider details on the beak).
- Stuff the beak lightly.
- Round 5: Decrease in each stitch around (4 sc). Join with a sl st.
- Round 6: Decrease in each stitch around (3 sc). Join with a sl st. Tie off and weave in the end.
- Sew the beak to the front of the head, slightly below the top.
4. Wings (make 2):
- With white yarn, chain 15 stitches.
- Turn, sc in each stitch back to the starting chain, ch 1, turn (14 sc).
- Round 2: sc in the first stitch, increase in the next stitch, sc in each of the next 11 stitches, increase in the last stitch, turn (16 sc).
- Round 3: sc in the first 2 stitches, increase in the next stitch, sc in each of the next 12 stitches, increase in the next stitch, turn (18 sc).
- Round 4: sc in the first 3 stitches, increase in the next stitch, sc in each of the next 14 stitches, increase in the next stitch, turn (20 sc).
- Rounds 5-7: sc in each stitch around, joining each round with a sl st. (20 sc each round)
- Fold the wing in half lengthwise and sew the sides together, leaving the bottom open.
5. Stuffing the wings:
- Lightly stuff the wings and sew the bottom opening closed.
6. Attaching the wings:
- Sew the wings to the body on either side, positioning them slightly below the top of the head.
7. Eyes:
- Sew on the two black safety eyes to the head.
8. Optional details:
- You can embroider small nostrils on the beak using black yarn.
- You can add orange felt feet to the bottom of the body.
9. Finishing touches:
- Your cute crochet goose amigurumi is complete once you've added all the desired details!
Tips:
- Use stitch markers to track rounds and identify where to sew on body parts.
- You can adjust the goose size by using a different yarn weight or crochet hook size.
- Feel free to experiment with different colors for the beak and wings to create a unique goose!


Leave a Reply