Craft the cutest 19cm amigurumi teddy bear with a shirt and suspenders! Perfect for gifting or decorating. Easy steps for beginners.
Crochet Teddy Bear With Removable Dress
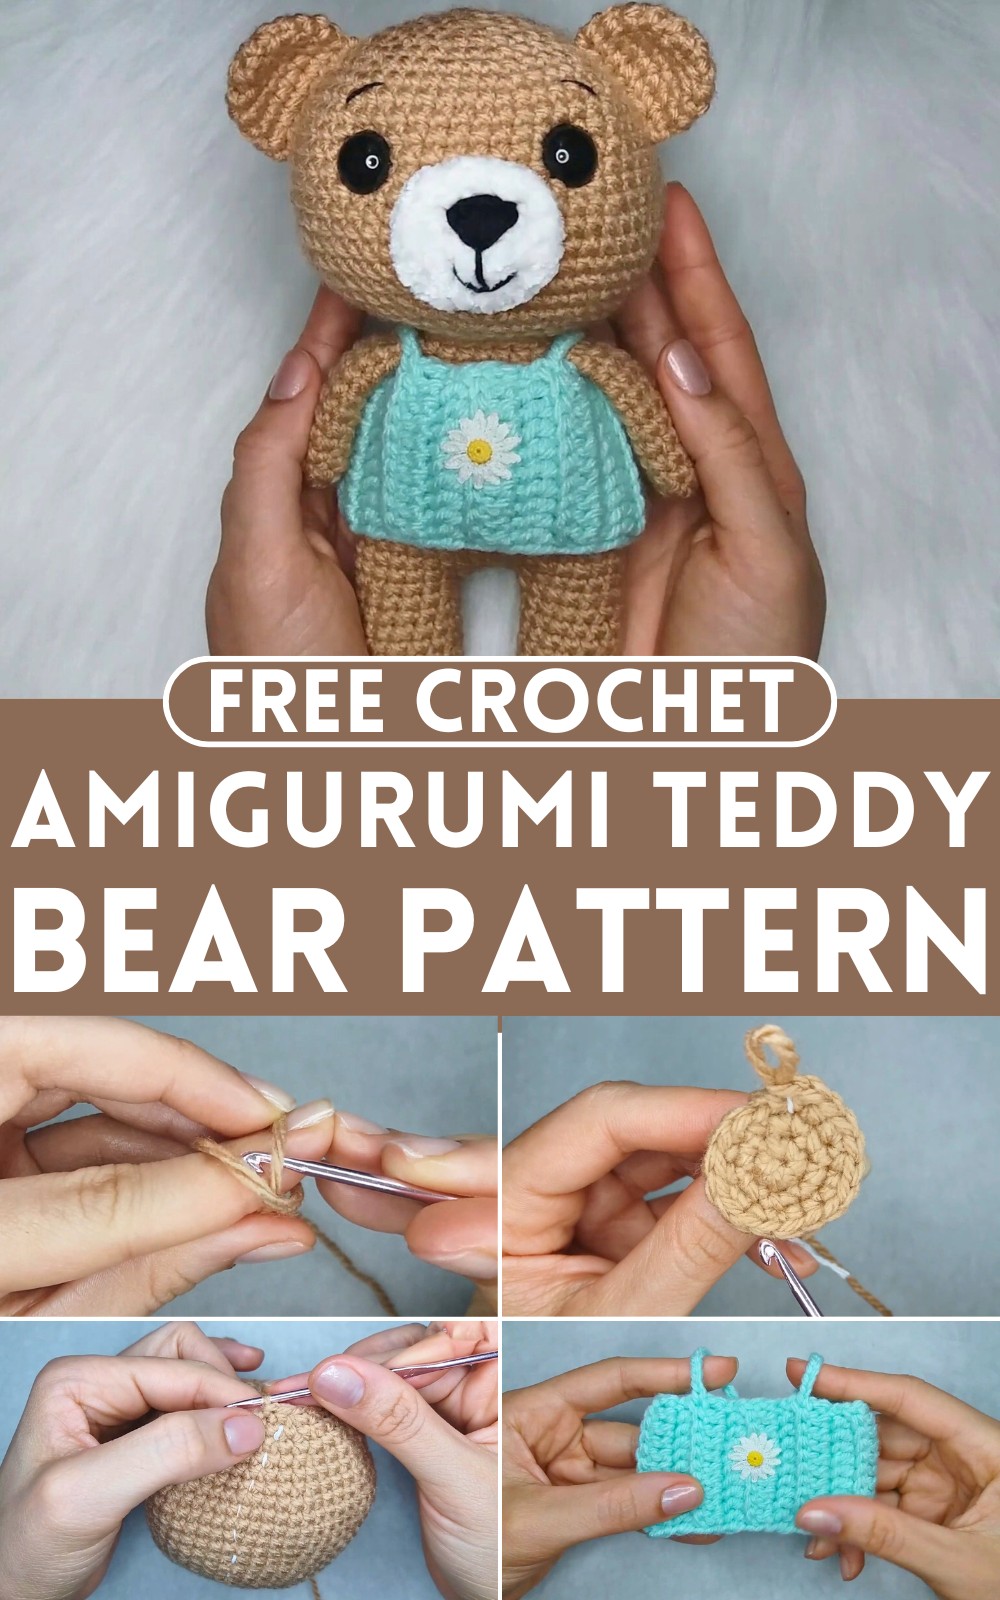
Get ready to create the cutest crochet companion ever! This Crochet Amigurumi Teddy Bear stands at 19 centimeters tall and shows an adorable shirt with suspenders. Using a 3mm hook and acrylic yarn, this bear is perfect for gifting, decorating, or even selling. The round head, floppy ears, and tiny limbs make it irresistibly huggable. The snout is crafted with soft velvet yarn, and safety eyes give it an expressive face. With detailed step-by-step instructions, even beginners can bring this charming bear to life.
Why Love This Pattern?
- Versatility: This cute teddy bear, standing at about 19 centimeters tall, is ideal for gifting, decorating, or even selling.
- Detailed Instructions: The video provides step-by-step guidance, with clear visuals and text instructions appearing on the screen for each round.
- User-Friendly Tips: The creator offers helpful tips such as marking the last stitch of each round with a piece of yarn and demonstrating techniques like the invisible decrease.
- Customization: The pattern allows for the use of your preferred yarn, ensuring that your bear can be as unique as you like.
- Add-On Options: The pattern includes finishing touches like a cute shirt, which is also made from scratch, enhancing the overall look of the bear.

How To Crochet Amigurumi Bear In Overall
Materials
- 3 mm crochet hook
- Acrylic yarn
- Stitch marker
- Safety eyes (15 mm)
- White sewing thread and needle
- Black thread for eyebrows
- Velvet yarn for snout (optional)
Head
- Round 1: 6 single crochets (sc) in magic ring.

- Round 2: 2 sc in each stitch (st) around (12 sts).
- Round 3: [1 sc, 1 increase (inc)] x 6 (18 sts).
- Round 4: 1 sc, 1 inc, [2 sc, 1 inc] x 5, 1 sc (24 sts).
- Round 5: [3 sc, 1 inc] x 6 (30 sts).
- Round 6: 2 sc, 1 inc, [4 sc, 1 inc] x 5, 2 sc (36 sts).
- Round 7: [5 sc, 1 inc] x 6 (42 sts).
- Round 8: 3 sc, 1 inc, [6 sc, 1 inc] x 5, 3 sc (48 sts).
- Round 9: [7 sc, 1 inc] x 6 (54 sts).
- Rounds 10-15: 54 sc around.
- Round 16: 4 sc, 1 inc, [8 sc, 1 inc] x 5, 4 sc (60 sts).
- Round 17: [9 sc, 1 inc] x 6 (66 sts).

- Rounds 18-19: 66 sc around.
- Round 20: [9 sc, 1 dec] x 6 (60 sts).
- Round 21: 4 sc, 1 dec, [8 sc, 1 dec] x 5, 4 sc (54 sts).
- Round 22: [7 sc, 1 dec] all around (48 sts).
- Round 23: 3 sc, 1 dec, [6 sc, 1 dec] x 5, 3 sc (42 sts).
- Round 24: [5 sc, 1 dec] x 6 (36 sts).
- Round 25: 2 sc, 1 dec, [4 sc, 1 dec] x 5, 2 sc (30 sts).
- Round 26: [3 sc, 1 dec] all around (24 sts).

Finish with a slip stitch and leave long tail for sewing.
Ears
- Round 1: 6 sc in magic ring.
- Round 2: 2 sc in each st around (12 sts).
- Round 3: [3 sc, 1 inc] x 3 (15 sts).
- Rounds 4-5: 15 sc around.
- Fold ear in half and sc through both sides (7 sts).
Finish with a slip stitch and leave long tail for sewing. Repeat for the second ear.
Legs (Make 2)
- Round 1: 6 sc in magic ring.
- Round 2: 2 sc in each st around (12 sts).
- Round 3: [3 sc, 1 inc] x 3 (15 sts).
- Rounds 4-9: 15 sc around.
Finish first leg, but do not finish second leg.
Body
- Round 10.1: Join legs with 3 chains.
- Round 10.2: 3 sc on first leg.
- Round 10.3: [5 sc, 1 inc] x 2.
- Round 10.4: On chains: 1 inc, 1 sc, 1 inc.
- Round 10.5: 2 sets of 5 sc and 1 inc, 3 sc on second leg.
- Round 10.6: 3 sc in each of the 3 chains (42 sts).
Remove stitch markers. Continue to work around:
- Rounds 11-16: 42 sc all around.
- Round 17: [5 sc, 1 dec] x 6 (36 sts).
- Rounds 18-20: 36 sc around.
- Round 21: [4 sc, 1 dec] all around (30 sts).
- Rounds 22-24: 30 sc around.
- Round 25: [3 sc, 1 dec] all around (24 sts).
- Round 26: 24 sc around.
Finish with a slip stitch and leave long tail for sewing.
Arms
- Round 1: 6 sc in magic ring.
- Round 2: [1 sc, 1 inc] x 3 (9 sts).
- Rounds 3-11: 9 sc around.
- Fold in half and sc through both sides (4 sts).
Finish with a slip stitch and leave long tail for sewing. Repeat for the second arm.
Snout
Follow pattern as shown in the video to create and attach using velvet yarn (optional).
Assembly
- Attach snout to the front of the head.
- Sew safety eyes with washers between 13th and 14th rounds.
- Make eyebrows with black thread.
- Attach ears to the sides of the head.
- Attach legs to the bottom of the body.
- Attach arms to the second round of the body from the top.
- Finish by stuffing bear and sewing head to body.
Shirt
- Chain 10.
- Row 1: DC in 2nd chain from hook and in each across.
- Repeat for desired width of the bear.
- Sew both sides shut.
- Create straps by chaining 12 and attaching on marked spots.
- Optionally add a flower applique and zigzag with thread at the top to adjust to bear's body.

Congratulations! Your teddy bear amigurumi is complete!


Leave a Reply