Crochet an adorable Jellyfish Keychain! This easy pattern is perfect for beginners and makes a cute bag charm or sweet gift.
Crochet Tiny Jellyfish Keychain Pattern
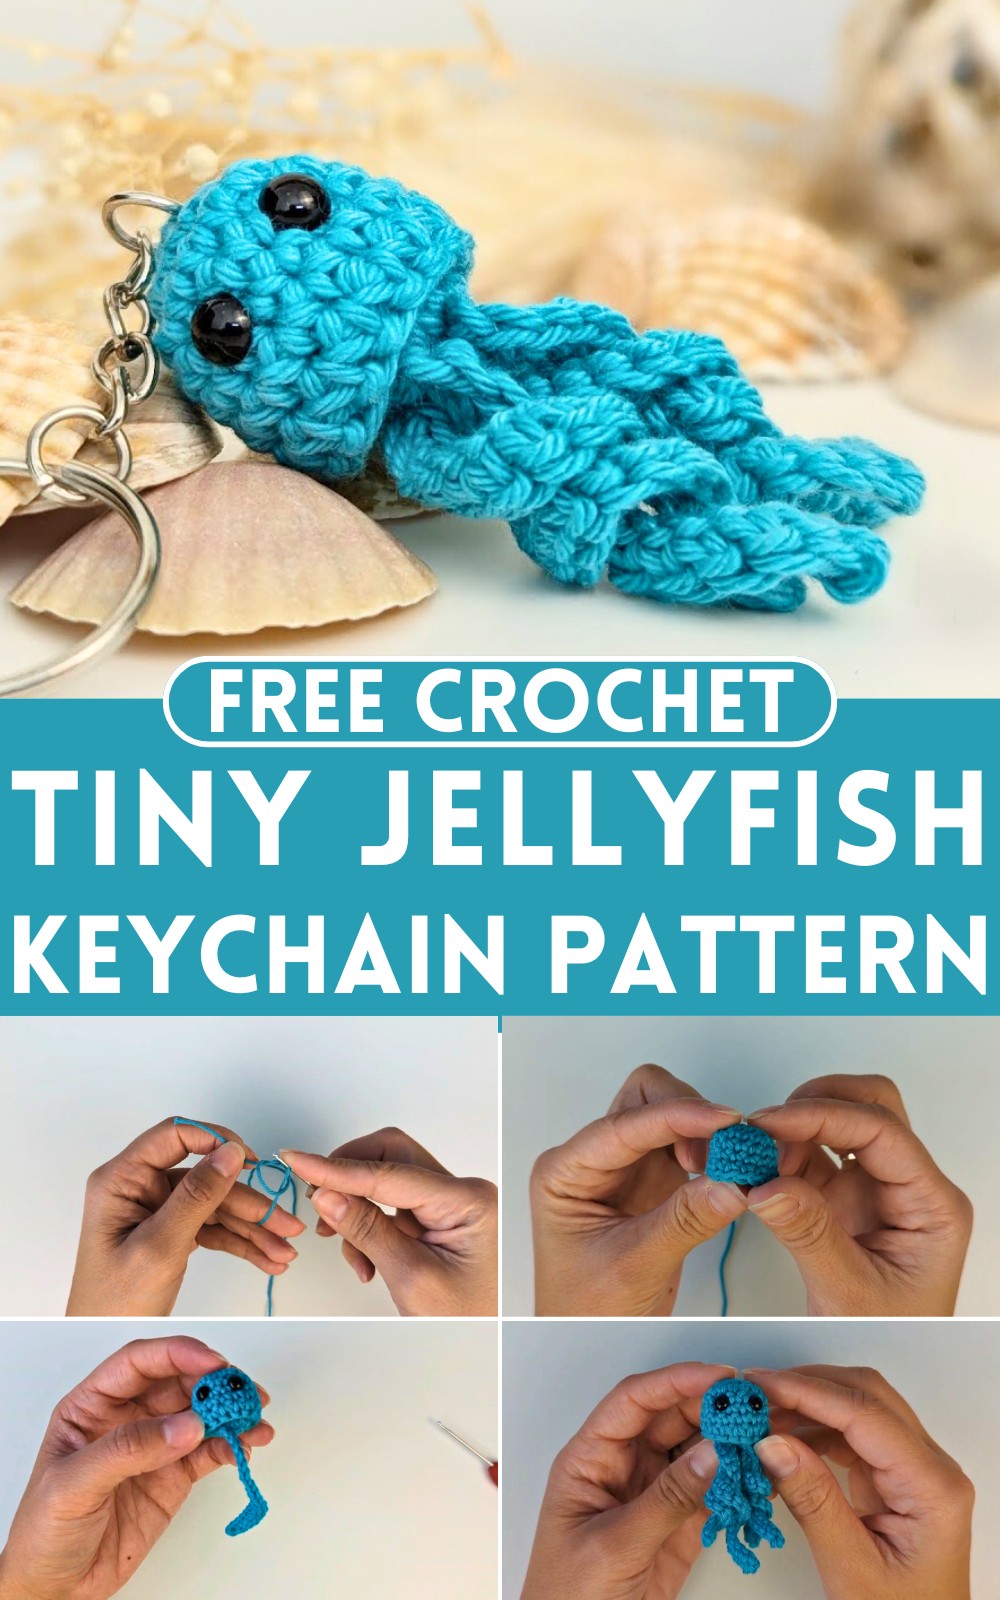
This tiny jellyfish is as cute as it is fun to make! The Crochet Tiny Jellyfish Keychain Pattern shows a round, puffy head with soft, wavy tentacles that give it an adorable, lifelike look. Small enough to fit in your palm, it’s perfect as a keychain, bag charm, or a sweet little gift. The simple design works up quickly, making it a great project for beginners and experienced crocheters alike. Use pastel shades for a soft, dreamy vibe or bright colors for a playful touch. Have fun crocheting!
Uses of Crochet Mini Octopus
- Keychain: Just like the mini jellyfish, a mini octopus can be a cute and whimsical keychain, adding a touch of personality to your keys.
- Bag Charm: Attach it to your handbag or backpack for a playful accessory that stands out.
- Car Mirror Decoration: Hang it on your rearview mirror as a fun and unique car accessory.
- Children’s Toy: These soft, small octopuses can be safe toys for young children and make for excellent comfort items.
- Desk Ornament: A small crochet octopus can make for a charming little desk buddy, adding some color and fun to your workspace.
- Gift Topper: Use the mini octopus to adorn gift packages, making your presents look extra special and creative.
- Pet Toy: With secure stitching and no small parts, these can be safe playthings for pets.

How To Crochet Amigurumi Octopus
Materials Needed:
- Cotton yarn in your desired color (e.g., bluish)
- 2 mm crochet hook
- Scissors
- 6 mm plastic eyes
- A small amount of toy stuffing
- Keychain ring
Jellyfish Head:
Round 1:
- Start with a magic ring.
- Crochet 6 single crochets into the magic ring. Use a stitch marker to mark your rounds.

Round 2:
- Work 1 increase in each stitch (2 single crochets in each stitch) around.
- You should have 12 stitches by the end of this round.
Round 3:
- Perform 3 single crochets, then increase by making 2 single crochets in the next stitch.
- Repeat this pattern two more times.
- You should have 15 stitches by the end of this round.
Rounds 4-6:
- Single crochet in each stitch around for three rounds.
- Maintain 15 stitches for each round.

Eye Placement:
- Place safety eyes between rounds 4 and 5 leaving 2 stitches in between them.
Jellyfish Bottom:
- Repeat Rounds 1 to 3 from the head section to form the bottom part.
- Do not cut the yarn after finishing these rounds.

Joining Head and Bottom:
- Begin joining the top and bottom parts of the jellyfish with single crochets around, working through both loops on both pieces.
- Before completely closing, fill the jellyfish with toy stuffing.
Final Closure:
- After adding the stuffing, continue single crocheting around to close.
- Finish with a slip stitch and cut the yarn, then weave in the ends.
Tentacles:
- For each tentacle, start between rounds 1 and 2:
- Chain 21.
- Turn and single crochet into the second stitch from the hook.
- Continue with 20 single crochets down the chain.
- Repeat this for each tentacle (usually four tentacles are made).
- Optionally, chain and arrange tentacles to give them a curled look.
Creating the Tentacle Curl:
- Pull each tentacle gently to encourage curling.
- Twist them together in pairs for a cute effect.
Finishing:
- Attach the keychain ring:
- Thread the ring through the top middle stitch of the jellyfish.
- Secure tightly, and trim any excess yarn.
Now you have a tiny jellyfish keychain! Enjoy creating this cute little crocheted creature. Don't forget to subscribe to the video creator if you enjoyed the tutorial.


Leave a Reply