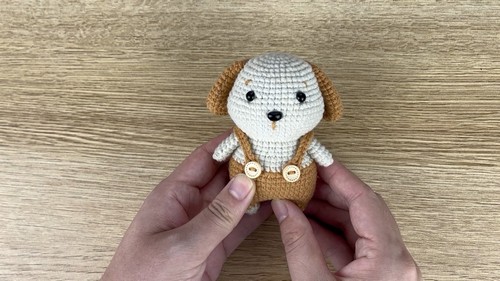
Why love make a cuddly crochet amigurumi puppy with a round head, floppy ears, and tiny nose. Perfect as a gift or toy for crochet lovers?
Crochet Amigurumi Puppy Pattern
This crochet puppy is as cuddly as a real one! The Crochet Amigurumi Puppy Pattern has a round head, floppy ears, and a tiny, lovable nose, making it irresistibly cute. With its soft, plush body and adorable paws, this little pup is perfect as a gift, toy, or decorative piece. You can customize it with different colors to create unique breeds or add a tiny collar for extra charm. Either a playful companion or a sweet handmade keepsake, this amigurumi puppy is a fun and rewarding project for all crochet lovers!

Crochet Puppy Amigurumi Pattern
Materials Needed:
- Yarn in colors of your choice
- Crochet hook appropriate for yarn
- Stitch marker
- Yarn needle
- Scissors
Abbreviations:
- MR = Magic Ring
- ch = Chain
- sc = Single Crochet
- inc = Increase (2 sc in 1 st)
- dec = Decrease (sc 2 stitches together)
- sl st = Slip Stitch
HEAD:
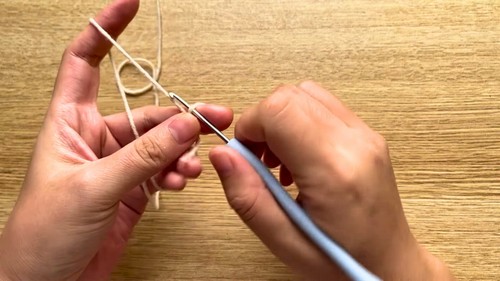
- Foundation: Start with a Magic Ring.
- Pass the yarn over your pinky, under the third and middle fingers, and over the index finger.
- Hold the ring with your middle finger.
- Insert the hook, yarn over, pull a loop through, and chain 1. This forms the Magic Ring.
- Round 1: Make 8 sc into the ring. (8 sts)
- Close the ring by pulling the tail.
- Sl st into the first st to close the round.
- Chain 1 to start the next round.
- Round 2: 8 increases (2 sc in each stitch) – (16 sts)
- Repeat: (1 sc, 1 sc inc)
- Round 3: (1 sc in the next stitch, 1 sc in the next stitch, inc) - repeat around (24 sts)
Continue following the pattern on screen for subsequent rounds until you build up the head to your desired size, typically by following incremental increases detailed in the video.
- Round 11:
- Work 6 sc, then (3 sc, 1 inc) - repeat 3 times.
- Finish the round with 6 sc.
- Round 16:
- Start with 3 sc.
- Then, do 4 sc followed by 1 dec. Repeat this pattern 3 times.
- Finish with 6 sc.
Complete the head by following the pattern displayed in the video.
LEGS: (Make 2)
- Round 1: Start with a Magic Ring with 6 sc worked into it. (6 sts)
- Tighten the yarn end.
- Sl st into the first stitch to close the round.
- Round 2: (1 sc, 1 sc inc) – repeat 3 times (9 sts)
- Change color to brown before pulling through the last 2 loops of round 2.
- Use the new color to sl st.
- Round 3: Work 9 sc around.
Complete the legs according to the pattern displayed in the video.
BODY:
- Join Legs:
- Cut off the yarn for the first leg. Do not cut the yarn off for the second leg.
- For the second leg, ch 6.
- Leg Joining:
- Join the first leg with a sl st. This forms the new beginning.
- Work 9 sc around the first leg.
- Work 6 sc into the half loops of the chain.
- Join leg two with 9 sc and 6 sc on the other half loop of the chain.
Complete the body according to the pattern displayed in the video, changing color as needed.
EARS: (Make 2)
- Foundation: Start with a Magic Ring of 6 sc. (6 sts)
- Tighten the yarn end.
- Sl st into the first stitch to close the ring.
ARMS: (Make 2)
- Foundation: Start with a Magic Ring of 6 sc. (6 sts)
- Tighten the yarn end.
- Sl st into the first stitch to close the ring.
Complete the arms according to the pattern displayed in the video.
ASSEMBLY:
- Attach Head:
- Pin the head in place ensuring it is aligned correctly with the body.
- Insert needle vertically between stitches of the head and draw yarn through encircling the stitch post.
- Continue this until the head is securely affixed.
- Attach Ears:
- Insert the needle into stitches between round 6-7 of the head and affix the ears by stitching through both the head and the ear.
- Insert the needle into stitches between round 6-7 of the head and affix the ears by stitching through both the head and the ear.
- Attach Arms:
- Insert the needle under stitches of the body and affix the arms in the same manner.
- Button Straps:
- Split 4-ply brown yarn and use 2-ply to sew button.
- Insert hook at the back of the body, ch 22, sl st into the 7th ch to form a ring.
- Continue slip-stitching back to the start. Hide the yarn end and fasten the button.


Leave a Reply