Create the adorable Crochet Amigurumi Kuromi with easy steps! Perfect for all skill levels, fans will love its cute features. Ideal gift or collectible!
Crochet Amigurumi Kuromi Pattern
Crocheting the Amigurumi Kuromi is fun and easy for everyone! This pattern begins with a basic magic circle and moves through rounds of simple stitches to make a cute, round body and head. Ideal for fans of Sanrio's cute troublemaker, Kuromi, this project has charming features like her pointy bonnet, puffy-tipped ears, and small arms and legs. To finish, you add felt pieces for eyes and a playful little skull. Making this small crochet plush toy is enjoyable and it’s a perfect gift or collectible!
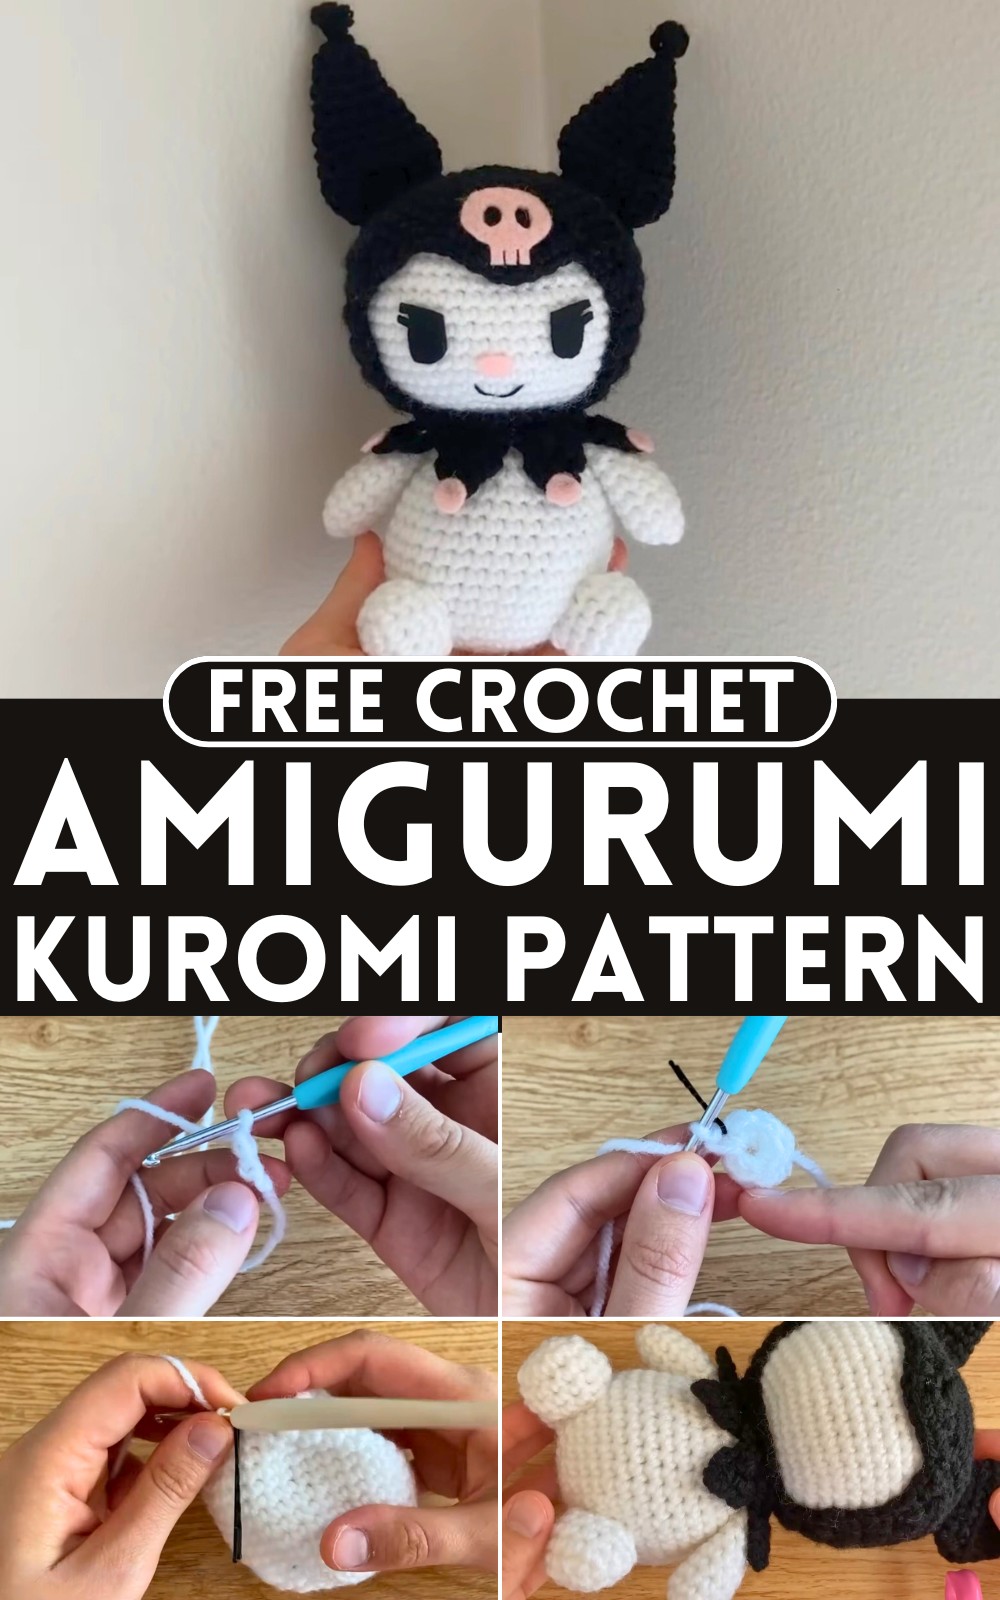
How To Crochet Amigurumi Kuromi
Materials Needed:
- Yarn (desired colour for body and accessory)
- Crochet hook (3.5 mm and 4.0 mm)
- Stitch markers or bobby pins
- Polyfill stuffing
- Scissors
- Yarn needle
- Felt (black and pink for facial features, white for skull)
- Glue gun (for attaching felt pieces)
Body:
- Begin:
- Create a magic ring and work 6 single crochets (SC) inside the ring.
- Alternatively, chain 2 and work 6 SC into the second chain from the hook.

- Round 1:
- Place a stitch marker in the last stitch.
- Round 2:
- 2 SC in each stitch around (6 increases) — you should have 12 stitches.
- Round 3:
- (1 SC in the next stitch, 1 increase) repeat for a total of 18 stitches.
- Round 4:
- (2 SC in the next 2 stitches, 1 increase) repeat for a total of 24 stitches.

- (2 SC in the next 2 stitches, 1 increase) repeat for a total of 24 stitches.
- Round 5:
- (3 SC in the next 3 stitches, 1 increase) repeat for a total of 30 stitches.
- Round 6:
- (4 SC in the next 4 stitches, 1 increase) repeat for a total of 36 stitches.
- Rounds 7 to 15:
- SC all around (36 SC per round).
- Stuff the Body:
- Fill with polyfill for shape and firmness.
- Round 16:
- (4 SC in the next 4 stitches, 1 decrease) repeat for a total of 30 stitches.
- Round 17:
- (3 SC in the next 3 stitches, 1 decrease) repeat for a total of 24 stitches.
- Round 18:
- (2 SC in the next 2 stitches, 1 decrease) repeat for a total of 18 stitches.
- Round 19:
- (1 SC, 1 decrease) repeat for a total of 12 stitches, and continue stuffing as needed.
Head:
- Begin:
- Attach yarn to the small opening created in Round 19.
- (1 SC, 1 increase) repeat for a total of 18 stitches.
- Round 1:
- Continue with the same pattern (2 SC, 1 increase) until reaching a total of 48 stitches.
- Rounds 2 to 9:
- SC all around (48 SC per round).
- Round 10:
- Create 6 decreases evenly spaced around to shape the head.
Bonnet:
- Magic Ring:
- Create a magic ring and work 6 SC into it.
- Alternatively, chain 2 and work 6 SC into the second chain (like the body).

- Progress:
- Follow the same pattern for increasing rounds as the body up to 48 stitches.
Bonnet Triangle:
- Round 9:
- Create an 8 SC base.
- Form triangle top by chaining 1 after the 8th SC.
- Work as follows: SC, decrease, 2 SC, decrease, 1 SC.
- Continue working until 2 stitches remain.
Side Curves of Bonnet:
- Round 11:
- Chain 1, turn, SC, decrease, 34 SC, decrease, SC.
- Repeat:
- Continue shaping the side curves by decreasing evenly as described.
- Repeat for 3 rows without decreases to form the curvature.
Attach Bonnet:
- Assembly:
- Chain and fit the bonnet onto the head with SC along the lower edge.
- Crochet accordingly to adjust the fit.

Finishing:
- Add Details:
- Create and attach small triangles along the bonnet’s edge for decoration.
- Make and attach the ears and other elements as described using similar techniques.
- Finalize facial features by attaching felt pieces as shown in the tutorial. Use hot glue for secure placement.
- Optional:
- For legs and arms, follow the same principles, adapting fitting instructions to desired lengths.
- Weave in all ends and ensure the project appears clean and finished.
Complete each part as per the given instructions and sew the respective parts together. Attach all felt pieces and facial features with precision for a polished look.


Leave a Reply